Friday, March 29, 2013

Breaking out

I took a break from the pillows and worked on my daughter's Easter dress this week. I'm waiting on some felt to come in from Taiwan anyway, so I figured I might as well!
 I modified a Sensibility pattern from their Regency Era line. I wanted the seams in the back to be reminiscent of the Regency dresses, but didn't want the Empire waist. So I just lengthened the pattern by two inches. I added a VERY full skirt, piping at the waistline, and now I'm debating whether or not I want to pull out my Serger and add a ruffle to the bottom hem... We'll see what I feel like doing tonight after kids are in bed.

Then I worked on the bonnet for a bonnet contest we're attending tomorrow. I took a normal, white hat that I pulled from the dollar bin at Target and turned it into this:

I looked at a ton of different poke bonnets on Pinterest, then found a tutorial at Tea in a Teacup that helped. I found some flowers at a thrift store and pulled them all apart to decorate the bonnet. The whole time I worked on this little hat all I could hear in my mind was Kitty and Lydia Bennet arguing over a bonnet. Made me giggle.

Then I put the whole outfit on my daughter to see how it looked.

I do believe she might be a contender in the "Prettiest Bonnet" category, but then I might just be incredibly biased!

Friday, March 22, 2013

Big finish

 This one was a long time coming. Wish I'd had more room to stretch it out all the way! A friend inherited the baskets from her grandmother, but she didn't know how to sew and asked me to assemble the quilt top for her. She gave me an inspiration quilt and sent me the fabric and squares. ONE YEAR AND A FEW MONTHS LATER (I'm such a lame friend) I finally got it finished. It was a fun, special project. It turned into a GIANT quilt and will fit a full sized bed nicely. She's going to hand quilt it, so this is going to be a giant, group effort quilt. I'm excited to see the finished product!

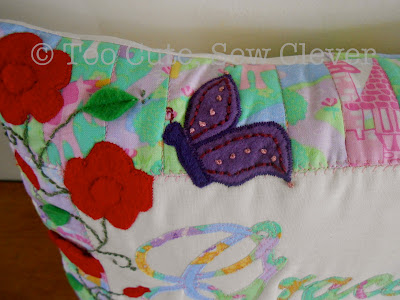
My next finish was a rush order for a little girl with two, very loose teeth!
 So fun! They also requested a down pillow. Must say that the down pillows are much easier to squish through the pocket, but much HARDER to shape nicely once you have.

 I added some really girly details for Grace. My favorite is the butterfly. But that's also because it is purple, and I adore the color purple.

 That dress was a booger to match to thread. I try to just go with what I have on hand, and fortunately I found something that was just right, but it took a while of hunting!

The pocket (sorry so blurry) is the middle rose on the vine. Little pocket, but it will work! Teeth tend to be small. ;)

Fortunately, my daughter didn't try to make off with this one. I think it is because she's gotten used to these NEVER being for her. But unless something crazy happens this next week and I get another rush order I'm going to have some time to sew for her. I've got to make her Easter dress and bonnet. Yay! I think I'll make a pillow for her, too.

After that I have a ton of leftover fabric. I'm thinking of putting together some ready-to-ship pillows. I'll leave the name square blank and wait for the order to get the child's name, add it, then send it on its way. I've got some Sock Monkey fabric, princess, frog princess, and some superhero fabric, so we'll see what comes of all of that. :)

Monday, March 4, 2013

Scrappy Messenger Bag

I received a Gypsy Girl charm pack for Christmas this last year and have been savoring the bright, happy colors for a while. It took me a long time to decide what I wanted to do with those delicious fabrics, but I finally settled on a messenger bag. I'm not a fan of giant diaper bags and as soon as my kids are old enough (i.e. they aren't constantly exploding diapers or requiring that I cart around the kitchen sink everywhere we go) I ditch the giant diaper bag and grab something smaller.

However, I now have two in diapers, and I really did need something bigger than my smaller purses but smaller than the giant diaper bag to tote around town. Thus, this bag was born!


I mostly followed a tutorial I found on Pinterest from No Time to Sew. Very easy to follow, and produced a decent sized bag. I added a back pocket:


I used the quilt-as-you-go method for that back pocket. I stumbled across the method on someone else's blog after they followed this tutorial at Oh, Fransson! I loved the idea and was itching to try it on something soon. My first attempt at a back pocket ended up getting a seam-ripper attack. I realized I wanted something scrappy-looking (like the front flap and front pocket), so I decided this was the perfect opportunity to try out quilt-as-you-go. LOVE it!

Front pocket was so cute and fun to put together! Easy-peasy, though the directions took some puzzling out. Don't know why, really, because once I got it the thing was ridiculously simple. Must have been late...

I deviated from the tutorial with this handle. I knew I wanted it scrappy, so I had to improvise.


So that's my new bag! It fits my wallet, iPod, phone, a few diapers and wipes, and a burp rag and one change of clothes for the baby very nicely. I've got four pockets on the inside, but forgot to take a picture. I'll take one of the pockets and a neatly packed bag later. :)

For now, I'm off! Got to show off my new accessory! :)


Friday, March 1, 2013

Rapunzel


Rapunzel is one of our favorite characters around here, too! Hope Carson likes her princess-themed pillow!

Hard to see, but in the other lanterns (as well as the big one) there is another layer of felt that is a different color and gives (sort of?) the illusion that it is glowing. Didn't go exactly as planned, but still looks cute I think.

Fortunately my daughter didn't attempt to run off with this one because I finished it while she was taking a rare nap (kids have ALL been sick this week. Three sickos is NOT fun!). So she never saw it, so I never had to fight it away from her. Oh, the cleverness of me! :)